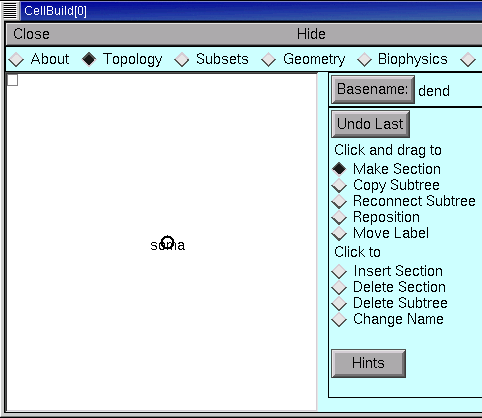
A word about the Hints button. There's a Hints button on almost every page of the CellBuilder (the sole exception is the "About" page). Each page's Hints button brings up a window full of useful tips for that particular page. Many of these go beyond what we can cover in this tutorial, so you're going to want to check them out for yourself.
The large white area is the CellBuilder's "canvas," which shows the sections in our model cell. When a CellBuilder is first created, it comes up with a section called soma.
The radio buttons just to the right of the canvas control what happens when we click on the canvas. Notice that the CellBuilder starts up in "Make Section" mode.
In "Make Section" mode, clicking on the canvas spawns a new section. If we just started clicking away, these new sections would be called dend[0], dend[1], . . . because the Basename is "dend" (look to the right of the Basename button, next to the canvas's right upper corner).
Let's do this right. We want to set up the apical dendrites, and we want them to be called ap[0], ap[1], and ap[2], so we need to change the Basename to ap.
To do this, click on the Basename button.
This brings up a window with an editable field.
Click inside this field.
Type the new Basename, then click on Accept.
Now the Basename is ap (see for yourself!) and we can start to build the apical tree.
To make a new section, position the cursor just to the right of the soma . . .
. . . press the left mouse button . . .
. . . and hold it down while dragging the section to the desired length.
Then release the button.
*--You can toggle this behavior on and off by going to the Management / Import page and clicking on the box "Don't draw short sections as circles".2. Notice that a new section springs into existence as a "rubber band" that connects the tip of the cursor to the nearest end of an existing section.
To make the distal apical branches, start by placing the cursor just to the right of the distal end of ap, then click and drag to arrange the new sections as shown in the Outline of this tutorial.
Next create the basilar branch and the axon in the same way. Use the other buttons as necessary (Basename, Undo Last, Delete Section, Change Name etc.). Finally, move the labels so they are next to the sections, not on top of them (hint: use Move Label).
Time to save everything to a session file!
Let's call it cell.ses
Next we specify the subsets.
Copyright © 1999-2006 by N.T. Carnevale and M.L. Hines, All Rights Reserved.