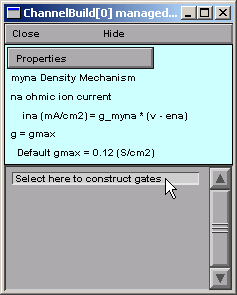
So click on this prompt
and a ChannelBuildGateGUI tool appears (we'll call it the GateGUI). This tool is used to specify gating that may involve any combination of HH-style equations and/or kinetic reactions.
Clicking on the GateGUI's Close button dismisses this window, but you can always get it back by clicking on the corresponding item in the bottom panel of the Channel Builder. But if you close the Channel Builder, you'll lose everything--unless you saved it to a session file.
A "big picture" perspective on what we're trying to do
Broadly speaking, in order to specify channel gating, we have to accomplish three related tasks :
With that in mind, the organization and use of the GateGUI tool is easy to understand. The top panel of this tool contains a canvas, which is used to create and destroy states and set up transitions between them. Above the canvas are three radio buttons labeled States, Transitions, and Properties. These buttons control what happens when you click and drag on items in the canvas. They correspond directly to the three related tasks we have to accomplish, and their left to right sequence hints at the order in which we will use them.
Make sure the States button is selected.
The canvas's "palette" offers two items called O and C. Clicking on one of these spawns a new state,
which you should then drag over to a convenient location on the canvas and release.
Do this several times to get the hang of it. Each new state will be named C, C2, C3 . . . and O, O2, O3 etc. (the "1" is omitted from the first C and O). To delete a state, just drag it off the canvas.
When you have had enough practice spawning and deleting states, make sure you end up with only two states.
- Notice that each time you create a new state, a new equation of the form
- x' = ax*(1 - x) - bx*x
- appears in the bottom panel of the Channel Builder.
Also, each time you delete a state, the corresponding equation disappears.
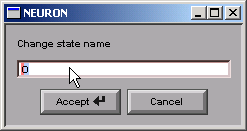
Let's change the names of these states to m and h. You may already have noticed that you can reposition states with the usual "click and drag". But if you just click and release without dragging
up pops a panel for changing the name of the state.


Notice that this also changes the corresponding equation in the bottom panel of the Channel Builder.
Now change the name of the other state to h.
You're ready for the next step when the Channel Builder looks like this :
Since we're creating an HH-style mechanism, there are no kinetic scheme states, and consequently no state transitions. So instead of connecting the m and h states with little "reaction pathway arrows," we leave them "isolated." The Channel Builder automatically treats such isolated states as HH-style gating variables.
Now save everything to a session file!
Next we specify the voltage dependence of the m and h states.
Copyright © 2004-2005 by N.T. Carnevale and M.L. Hines, All Rights Reserved.